Thursday, April 19, 2012

Soft cloth book

My next door neighbor had a baby shower recently. In addition to purchasing something from her registry, I also gave her a soft cloth book. She loves books just as much as I do, and this cloth book will be a good one for her baby to start with (not counting the books that she's already reading to him before he's even born).

To make the book, start with white or light colored soft cotton flannel. Cut four pieces about 6 by 12.  Lay out small scraps of fabric to form the applique designs on each page. Cotton or flannel prints with kids designs are a great shortcut. You can also use small pieces of knits or fleece for textured areas. Fill some areas with stuffing to give them more dimension. I chose to use general pictures so that my neighbor can make up her own stories to go with them, but you could add words or personalize it with machine embroidery.

Start by tacking the pieces together with straight stitches or iron-on adhesive. Then go around again with a zigzag or satin stitch to make sure that all edges are secure and no adhesive or stabilizer is sticking out. Everything needs to be safe to chew and to machine wash.

After you have attached the pictures to the pages, sew each pair of pages together. Put the right sides together, and sew around the edge, leaving a hole to turn it right side out. If you put the hole near the center of the page, you can use it to anchor a small loop of ribbon so the book can be clipped on to a toy bar or stroller. Once you've turned each pair of pages right side out, stitch a border all the way around to stiffen the edges slightly. Then stack the pages and sew down the center. Clip all loose threads, wash the book, and then check again for loose threads.
On this page, the teddy bears are cut from a baby flannel fabric. The tree is made from a flannel "yo-yo" filled with stuffing and then quilted.

The house is made from a scrap of pre-quilted material, and the door is a separate flap that can be opened. There's a smiling star hiding behind it.

The jeans and shirt are made from scraps of real clothes. The boots are a fake suede type of fabric, wrapped around stabilizer cut into the boot shape.

Tuesday, April 3, 2012

More Origami Projects

I am still working on collecting more origami patterns for my kindle book project. I need more people to test the individual patterns, because so far I have gotten reviews from my family that the projects are too hard, but friends say they are too easy! I can post a few directions if there's any interest.

Cat bookmark based on a heart shape.
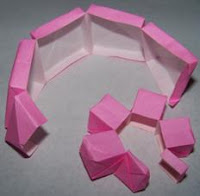
 Chain of boxes
 Swirl Flower
 Four Hearts
 Butterfly
 Spiral
 Tree (waterbomb bases)
Box variations

3-Color Inkle Pick-Up Weaving

It has been almost a year since I've worked on a new inkle weaving project, but here are a couple I did a while ago with 3-color pick up designs. The light blue is not as bold in the first design, but the red, black, and white all stand out well in the second one. Setting up the background for three colors is not much harder than for two colors. If I stick to simple symmetric designs I can keep track of them easily.

Stained Glass Christmas Trees

Last November and December, my son and I worked on stained glass Christmas trees. It was a good way to use up some scraps of green glass, and I experimented with adding beads, wire, and glass gems. We packed them up like cookies in a box with green tissue and my husband gave them out at work.


Recycled Clear Plastic Origami

For the last few months, I have been testing origami designs. Some will be used as part of a demo for elementary school children, and some are for my Kindle book project. I will be posting more pictures soon.

This design was made with a strip of clear plastic from a toy package. I used permanent markers for the color, but I think that paint designed for suncatchers might look better. When working with this stiff plastic, I recommend testing the design with card stock first, and watch out for sharp edges. Since the creases turn white, I didn't want to make any extra lines. This would be a good material for small boxes or simple shapes. My son used another piece to make a lampshape. He stapled it into a cone shape, and then applied several layers of ink and paint. He drew some designs on the inside, spray painted the outside white to make it frosted, added more drawings on the outside, and then a clear coat to protect it. When the light shines through, you can see the hidden patterns from the inside. 
After I made this design, I found an article from someone else who used clear cellophane to make origami cranes. http://www.thecheesethief.com/2011/11/how-to-fold-glass-like-origami-cranes.html   This is a softer, more flexible material, and the creases do not turn white like the stiff plastic.